
Making Your Own Orgonite
Are you ready to start working with the positive energy emitted by orgonite? The following instructions will guide you through the process of creating a block of orgonite that can be used for many different purposes. It is particularly helpful to place the finished piece near someone that is healing or recovering from an illness. It can also be used to brighten the mood and positivity of family interactions simple by allowing it to live in a family space.
this material the materials such as Polyester resin and metal shavings are inexpensive and common. Most hardware or craft stores will carry any necessary supplies and provide detailed instructions for curing times and appropriate molds.
Below is a basic recipe to help you get started with orgonite. You will need to find a suitable mold for your orgonite. Some people use small plastic containers that have been thoroughly cleaned. I have also seen a small glass mason jar used, and the jar was simply broken carefully to release the cured orgonite.
With every step you must exercise caution as there are multiple hazards inherent in this process.
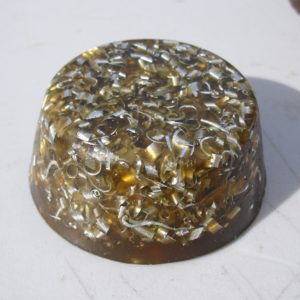
For the artistically minded creating Orgonite is an opportunity to create beautiful pieces. So feel free to experiment with pigments, adding decorative ingredients like dried flowers, and even small charms and trinkets.
For your ratio of resin to ingredients a 50/50 mix is a good rule.
Supplies
- Your epoxy mold. Silicone is easiest to work with.
- Iron powder or shavings. (CAUTION: Breathing powdered metals can be fatal. Wear a mask throughout this entire process.
- 2-part polyester epoxy resin clear or colored.
- Small single or double terminated Quartz crystal.
- Spay on mold release or vegetable oil for the interior of the mold to ease in releasing the cured resin
- Soapy water for cleanup
- Eye protection
- Rubber gloves
- Stirring sticks or chopsticks
- Measuring cups
Directions
- While wearing gloves and using eye protection spray down the mold with release.
- Follow the mixing directions for the resin and measure out the correct portions of resin and hardener.
- Have all ingredients ready to go.
- Mix your epoxy resin very thoroughly.
- Pour a shallow layer of epoxy resin in your mold. Just enough to cover the bottom of mold.
- Mix your iron powder with the remaining epoxy mix.
- If using colors or additional materials, you may wish to pour your orgonite in layers, allowing each layer to filly cure before adding additional layers.
- Pour your iron, epoxy mix into the mold, filling it completely.
- Let the epoxy cure for one hour, then push the crystal into the center of the epoxy leaving the terminating end to stick up just slightly above the surface.
- Let the entire thing cure and gently remove from the mold.
- Polish with a fine grit sandpaper or polish paste.
Do not be disappointed if you first few attempts do not come out perfect. Like any skill making Orgonite takes practice and will often take time to refine.
Once construction is complete, place your finished orgonite cast in the corner of your living room or bedroom and see if you can notice a difference in the feel of the room after a day or two.
